Husqvarna Embroidery Machine: Common Errors in Puckering Embroidery Designs and Solutions
Husqvarna Embroidery Machine: Common Errors in Puckering or Distorted Embroidery Designs and Solutions
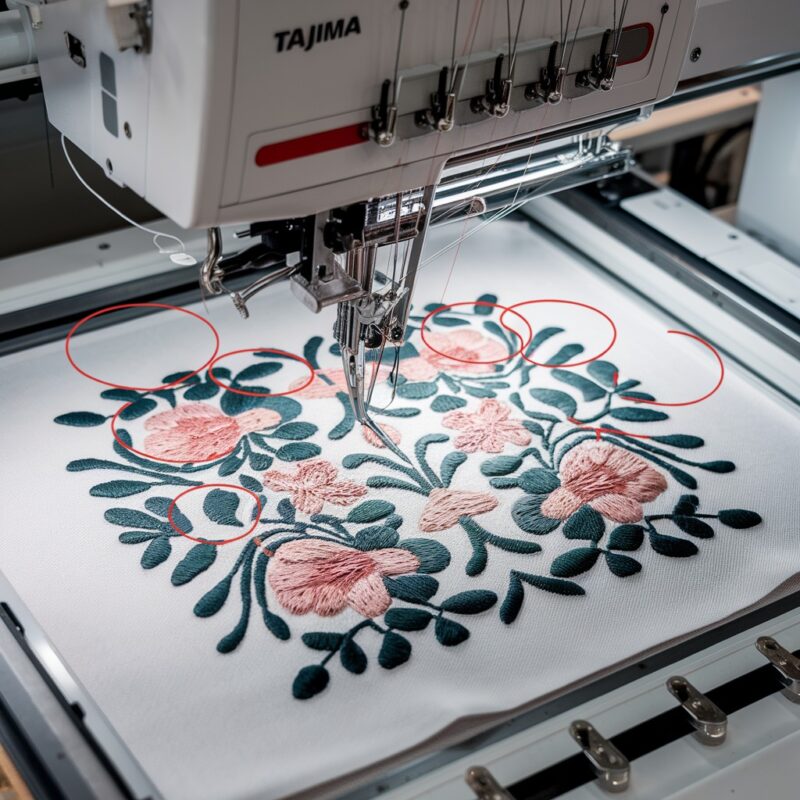
Embroidery enthusiasts using Husqvarna machines sometimes encounter puckering or distorted designs, which can be frustrating and compromise the quality of their work. These issues are usually caused by a variety of factors related to fabric tension, thread, or machine settings. In this blog, we’ll look at the common reasons behind puckering and distorted designs on Husqvarna embroidery machines, along with the solutions needed to address them.
Common Causes of Puckering or Distorted Embroidery Designs in Husqvarna Machines
- Improper Fabric Hooping
- Cause: Fabric that is not hooped tightly or evenly can shift during stitching, leading to puckering or distorted designs.
- Solution: Ensure the fabric is hooped firmly without overstretching. The fabric should be taut but not stretched out of shape. Double-check that the stabilizer is secure as well.
- Incorrect Stabilizer
- Cause: Using the wrong type or weight of stabilizer can result in insufficient support for the fabric during embroidery, leading to puckering.
- Solution: Choose the appropriate stabilizer for your fabric and design. Lightweight fabrics require a stronger stabilizer, while heavier fabrics may need a tear-away stabilizer. Always use a stabilizer that matches the fabric type and the complexity of your design.
- Thread Tension Issues
- Cause: Improper thread tension, whether too tight or too loose, is one of the most common causes of puckering in embroidery designs.
- Solution: Adjust the thread tension according to the fabric and design. You may need to lower the tension for delicate fabrics and increase it for thicker materials. Perform a test stitch to check the tension before starting on the actual project.
PROMOTIONAL SECTION
The All-in-One Solution For All Your Embroidery Business!
Enjoy $0.90 / 1000 Stitches Logo Digitizing
Monthly Cash Back, Free Delivery on Store-wide Products, Dedicated Account Manager, Exclusive Client Dashboard Panel, Bonus Credit & much more.
SIGN UP TODAY & GET FIRST 3 ORDER ABSOLUTELY FREE

Unlock game-changing benefits: expert digitizing services, technical embroidery guidance, seamless management of your business essentials, and free delivery on storewide products—all just for signing up with us. Don’t let these exclusive perks pass you by!

No Credit Card Required
Stay secure with no need to share your credit or debit card details! Experience 100% safe payment methods, including the option to purchase credits for your future orders. Plus, enjoy free credit as a bonus with every credit purchase and more exclusive benefits.

A Game-Changing Advantage
Imagine having a dedicated account manager by your side, ready to handle all your embroidery needs with precision and care. Whether it’s managing your digitizing orders, delivering essential embroidery supplies based on your every embroidery order, or sourcing those hard-to-find spare parts like motors, circuit boards, or sensors, we’ve got you covered. This incredible service ensures your business runs seamlessly, all at no extra cost or monthly fee.
It’s not just support—it’s the ultimate embroidery partnership you didn’t know you were missing for a $0 charge!Exclusive Client Dashboard Panel
Get Free Account Setup (T&C Applied) and enjoy exclusive benefits: unlimited free estimate requests, streamlined order management, complimentary edit requests, 24/7 access to our ticket system, fast 6-12 hour turnaround times, round-the-clock email and live chat support, and 1-year free design file backup and more.

Recurring Monthly Cashback
Experience out of the box services with Cashback on monthly basis along with discount vouchers on Shop for Registered customers up to 60% on supplies, accessories, spare parts & sensors & Circuit boards and add extra value to your embroidery business.

Free Delivery on all Shop Products
Enjoy free delivery on embroidery supplies, accessories, spare parts, sensors & circuit boards, and store-products, delivered straight to your doorstep! Unlock this exclusive benefits by registering with us for all your digitizing needs. (Embroidery Machine Not Included)
- Incompatible Fabric and Thread Combination
- Cause: Using incompatible thread types for certain fabrics can result in puckering or distorted stitches.
- Solution: Match your thread type with the fabric being used. For example, use polyester or rayon threads for lightweight fabrics and stronger threads like cotton for heavier materials.
- Machine Speed Too High
- Incorrect Needle Size
- Cause: Using a needle that is too large or too small for the fabric can create holes or cause puckering during embroidery.
- Solution: Use the correct needle size for your fabric. A larger needle is better for thicker fabrics, while a smaller, finer needle is recommended for lightweight or delicate materials. Ensure the needle is also sharp and in good condition.
- Fabric Shrinkage
- Cause: Some fabrics shrink when embroidered, causing puckering or distorted designs after washing.
- Solution: Pre-wash the fabric before embroidering to avoid shrinkage. This is especially important for natural fibers like cotton. Pre-shrinking ensures that the fabric will hold its shape after embroidery and washing.
- Design Density
- Cause: Overly dense embroidery designs can lead to puckering, as too many stitches in a small area put stress on the fabric.
- Solution: Adjust the design density if possible, or choose a design with less stitch density. Alternatively, use a stronger stabilizer to handle the additional stress on the fabric.
Solutions to Prevent Puckering and Distortion
- Test Stitching: Always run a test stitch on scrap fabric to assess how the fabric, thread, and stabilizer will perform together before starting your actual project.
- Use the Right Tools: Ensure that the needle, thread, stabilizer, and hoop are suitable for your specific project.
- Monitor Machine Settings: Regularly check your machine’s tension and speed settings to ensure they are optimized for your current project.
- Proper Hooping: Double-check the fabric and stabilizer to make sure they are securely hooped, ensuring no movement during stitching.
Conclusion
Puckering and distorted embroidery designs can be common issues when working with Husqvarna machines, but with the right adjustments and proper preparation, these problems are easily avoidable. From using the correct stabilizer to ensuring optimal thread tension and machine settings, paying attention to these key areas will help you achieve flawless, professional results in your embroidery projects.