Janome Embroidery Machine: Common Errors and Solutions
Embroidery machines like those from Janome are incredibly versatile and powerful tools for both hobbyists and professionals. However, like any sophisticated piece of technology, they can encounter a range of issues that can be frustrating and time-consuming if not addressed properly. In this blog post, we will explore the most common errors associated with Janome embroidery machines and provide detailed solutions to help you keep your machine running smoothly.
Introduction to Janome Embroidery Machines
Janome has been a trusted name in the world of embroidery for decades, known for producing machines that are reliable, user-friendly, and capable of delivering high-quality embroidery work. Whether you’re working on simple designs or intricate patterns, a Janome embroidery machine can help bring your creative vision to life. However, even the best machines can encounter errors. Understanding these common issues and knowing how to address them can save you time and frustration, ensuring a smooth embroidery experience.
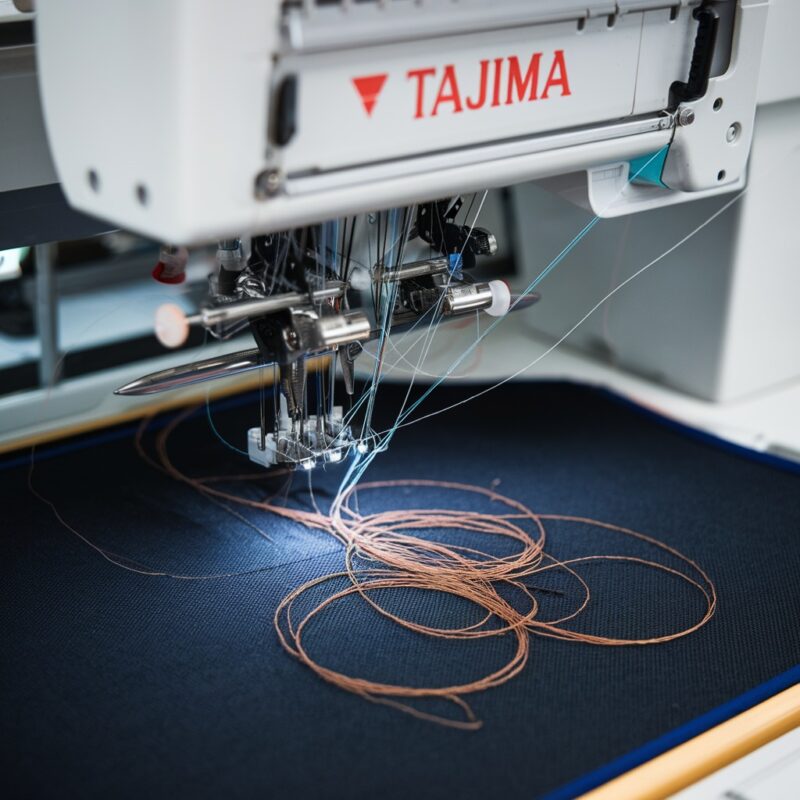
Thread Breaks Frequently
Causes
Frequent thread breaks can be one of the most common and annoying problems when using an embroidery machine. The causes can vary, including:
- Incorrect Threading: If the machine is not threaded correctly, it can lead to tension problems, causing the thread to break.
- Tension Issues: If the thread tension is too tight, it can strain the thread, leading to frequent breaks.
- Poor-Quality Thread: Low-quality or old thread can be brittle and prone to breaking.
- Wrong Needle Type or Size: Using the wrong needle for your fabric or thread can cause undue stress on the thread, leading to breaks.
Solutions
- Re-thread the Machine: Carefully re-thread the machine, following the manual’s instructions to ensure it’s done correctly.
- Adjust Tension Settings: Check and adjust the tension settings to ensure they are appropriate for your fabric and thread.
- Use High-Quality Thread: Invest in high-quality thread that is suitable for embroidery to reduce the risk of breaks.
- Check Needle Compatibility: Make sure you are using the correct needle type and size for your project.
PROMOTIONAL SECTION
The All-in-One Solution For All Your Embroidery Business!
Enjoy $0.90 / 1000 Stitches Logo Digitizing
Monthly Cash Back, Free Delivery on Store-wide Products, Dedicated Account Manager, Exclusive Client Dashboard Panel, Bonus Credit & much more.
SIGN UP TODAY & GET FIRST 3 ORDER ABSOLUTELY FREE

Unlock game-changing benefits: expert digitizing services, technical embroidery guidance, seamless management of your business essentials, and free delivery on storewide products—all just for signing up with us. Don’t let these exclusive perks pass you by!

No Credit Card Required
Stay secure with no need to share your credit or debit card details! Experience 100% safe payment methods, including the option to purchase credits for your future orders. Plus, enjoy free credit as a bonus with every credit purchase and more exclusive benefits.

A Game-Changing Advantage
Imagine having a dedicated account manager by your side, ready to handle all your embroidery needs with precision and care. Whether it’s managing your digitizing orders, delivering essential embroidery supplies based on your every embroidery order, or sourcing those hard-to-find spare parts like motors, circuit boards, or sensors, we’ve got you covered. This incredible service ensures your business runs seamlessly, all at no extra cost or monthly fee.
It’s not just support—it’s the ultimate embroidery partnership you didn’t know you were missing for a $0 charge!Exclusive Client Dashboard Panel
Get Free Account Setup (T&C Applied) and enjoy exclusive benefits: unlimited free estimate requests, streamlined order management, complimentary edit requests, 24/7 access to our ticket system, fast 6-12 hour turnaround times, round-the-clock email and live chat support, and 1-year free design file backup and more.

Recurring Monthly Cashback
Experience out of the box services with Cashback on monthly basis along with discount vouchers on Shop for Registered customers up to 60% on supplies, accessories, spare parts & sensors & Circuit boards and add extra value to your embroidery business.

Free Delivery on all Shop Products
Enjoy free delivery on embroidery supplies, accessories, spare parts, sensors & circuit boards, and store-products, delivered straight to your doorstep! Unlock this exclusive benefits by registering with us for all your digitizing needs. (Embroidery Machine Not Included)
Birdnesting (Thread Bunching Under Fabric)
Causes
Birdnesting, where the thread bunches up under the fabric, is a common issue with embroidery machines. The potential causes include:
- Incorrect Bobbin Insertion: If the bobbin is not inserted correctly, it can lead to uneven thread tension.
- Tension Issues: If the tension is too loose, it can cause the thread to bunch up.
- Improper Hooping: If the fabric is not properly hooped, it can shift during embroidery, leading to bunching.
Solutions
- Reinsert the Bobbin Correctly: Ensure the bobbin is placed correctly and the thread is pulled through the tension slot.
- Adjust Tension: Check both the upper thread and bobbin tension and adjust as necessary.
- Properly Hoop the Fabric: Ensure the fabric is taut in the hoop and properly secured to prevent shifting.
Skipped Stitches
Causes
Skipped stitches can disrupt the flow of your design and leave gaps in your embroidery. Common causes include:
- Dull or Bent Needle: A dull or bent needle can fail to catch the bobbin thread, resulting in skipped stitches.
- Incorrect Needle Size: Using a needle that is too large or too small for your fabric and thread can lead to skipped stitches.
- Improper Threading: If the machine is not threaded correctly, the thread may not loop properly, causing skips.
- Insufficient Stabilization: If the fabric is not stabilized correctly, it can move during stitching, causing skips.
Solutions
- Replace the Needle: Regularly replace the needle, especially if it becomes dull or bent.
- Use the Correct Needle Size: Choose the correct needle size for your fabric and thread.
- Re-thread the Machine: Ensure the machine is threaded correctly, following the manual’s guidelines.
- Use Proper Stabilizers: Make sure the fabric is adequately stabilized with the right type of stabilizer for your project.
Needle Breaks
Causes
Needle breaks are not only frustrating but can also damage your machine or project. Causes can include:
- Thick Fabric: Trying to embroider through thick fabric without the appropriate needle can cause the needle to break.
- Incorrect Needle Size: Using a needle that is too thin or too thick for the fabric or thread can lead to breaks.
- Tension Issues: If the thread tension is too tight, it can put excessive pressure on the needle.
- Obstructions: If the needle hits a hoop, foot, or other obstruction, it can snap.
Solutions
- Choose the Right Needle: Use a needle that is appropriate for the thickness and type of fabric you are working with.
- Adjust Tension: Ensure the thread tension is set correctly to avoid putting unnecessary stress on the needle.
- Clear Obstructions: Double-check that there are no obstructions in the needle’s path.
Design Misalignment
Causes
Design misalignment can ruin an entire project, and it can be caused by:
- Fabric Shifting in the Hoop: If the fabric shifts during embroidery, it can cause the design to become misaligned.
- Incorrect Hooping: If the fabric is not hooped correctly, it can lead to misalignment.
- Machine Calibration Issues: If the machine is not calibrated correctly, the design may not align properly.
Solutions
- Secure the Fabric: Make sure the fabric is tightly and evenly hooped to prevent shifting.
- Recalibrate the Machine: If alignment issues persist, recalibrate the machine according to the manufacturer’s instructions.
- Avoid Stretching the Fabric: Ensure the fabric is flat and not stretched when hooping.
Thread Fraying
Causes
Thread fraying can cause visible flaws in your embroidery and may be due to:
- Poor-Quality Thread: Low-quality thread is more prone to fraying and breaking.
- Small Needle Eye: If the needle eye is too small for the thread, it can cause fraying.
- Tension Issues: Incorrect tension can cause the thread to rub excessively against the needle and other parts, leading to fraying.
Solutions
- Use High-Quality Thread: Opt for high-quality embroidery thread to reduce the risk of fraying.
- Choose the Right Needle: Use a needle with an eye large enough for the thread you are using.
- Adjust Tension: Check and adjust the thread tension to ensure it is not too tight.
Machine Freezes or Stops Mid-Design
Causes
It can be frustrating when your machine freezes or stops in the middle of a design. This can be caused by:
- Overheating: Continuous use without breaks can cause the machine to overheat.
- Software Issues: Outdated or buggy software can cause the machine to freeze.
- Power Surge: A sudden power surge can disrupt the machine’s operation.
Solutions
- Allow the Machine to Cool Down: If the machine overheats, turn it off and let it cool down before continuing.
- Check for Software Updates: Ensure that your machine’s software is up to date to prevent bugs and glitches.
- Use a Surge Protector: Plug your machine into a surge protector to safeguard against power surges.
Bobbin Thread Not Being Picked Up
Causes
When the bobbin thread isn’t being picked up, it can halt your embroidery project. This issue can be caused by:
- Incorrect Bobbin Insertion: If the bobbin is not inserted correctly, the machine may not be able to pick up the thread.
- Improper Needle Insertion: If the needle is not inserted correctly, it may not catch the bobbin thread.
- Tension Too Tight: If the tension is too tight, the needle may not be able to catch the bobbin thread.
Solutions
- Reinsert the Bobbin and Needle: Make sure both the bobbin and needle are inserted correctly according to the machine’s manual.
- Adjust Tension: If tension is too tight, loosen it slightly to see if this resolves the issue.
Hoop Sensor Error
Causes
Hoop sensor errors can be caused by:
- Incorrect Hoop Size: Using the wrong hoop size for the selected design can trigger a sensor error.
- Improper Hoop Attachment: If the hoop is not attached correctly, the sensor may not detect it properly.
Solutions
- Use the Correct Hoop Size: Ensure you are using the correct hoop size for your design and machine settings.
- Attach the Hoop Properly: Double-check that the hoop is securely attached to the machine before starting your design.
Poor Stitch Quality
Causes
Poor stitch quality can detract from the overall appearance of your embroidery. This issue can be caused by:
- Incorrect Thread Tension: If the thread tension is too loose or too tight, it can affect stitch quality.
- Wrong Needle: Using the wrong needle for your fabric and thread can result in poor stitches.
- Low-Quality Thread: Poor-quality thread can lead to uneven stitching.
Solutions
- Adjust Thread Tension: Fine-tune the thread tension to ensure it’s appropriate for your fabric and thread.
- Use the Right Needle: Make sure you’re using the correct needle for your specific project.
- Use High-Quality Thread: Choose high-quality thread to improve the overall stitch quality.
Maintenance Tips for Janome Embroidery Machines
Regular maintenance is crucial to keep your Janome embroidery machine running smoothly and to prevent common errors. Here are some maintenance tips:
- Clean the Machine Regularly: Remove lint and dust from the machine, especially around the bobbin area and needle plate.
- Oil the Machine: Follow the manufacturer’s instructions to oil the machine regularly, ensuring smooth operation.
- Check and Replace Needles: Regularly check the needle for any signs of wear or damage and replace it as needed.
- Use the Machine Correctly: Always follow the manual’s instructions for threading, hooping, and operating the machine.
Conclusion
Embroidery is a rewarding craft, but dealing with machine errors can be frustrating. By understanding the common errors associated with Janome embroidery machines and knowing how to troubleshoot them, you can save time and ensure your projects turn out beautifully. Regular maintenance and proper use of the machine are key to avoiding many of these issues. If you encounter persistent problems, don’t hesitate to consult your machine’s manual or reach out to Janome support for assistance.
Happy embroidering!