- July 16, 2026
Custom Small Embroidered Bee Patches | 360 Digitizing
Home / custom embroidery patches / Portfolio
What is this page? This page documents a completed custom patch order — 10 pieces of embroidered patch with sew-on backing, produced by 360 Digitizing Solutions for an event merchandise organizer. Browse the specs, production notes, and quality checklist below.
Customer’s Design
Order Specs
| Quantity | 10 pcs |
| Patch Type | Embroidered Patch |
| Size | 1.2in x 1.2in |
| Colors | 3-Color |
| Backing | Sew-On Backing |
| Border | Satin Stitch Border |
Project Overview
Production Run: 10-Piece Embroidered Bee Patches
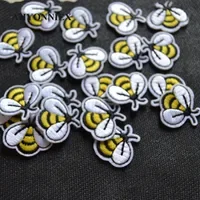
We recently completed a small run of 10 custom embroidered patches for an event merchandise organizer. The client supplied a clean vector of a small honeybee, and we needed to translate that into a tight, high-density embroidered emblem that could withstand wear while keeping its shape. Because of the intricate wings and antennae, a standard merrowed edge was not an option. Instead, we opted for a clean satin-stitched border with a precision heat-cut edge.
Digitizing and Stitch Density Setup
When you are dealing with small patches—these are about 1.2 inches square—precision digitizing is everything. If your stitch density is too high, the fabric puckers and the needle cuts the thread. If it is too low, the backing material shows through. We set up a solid grid underlay to stabilize the yellow and white fills before running the satin topstitches. For the yellow body stripes and white wings, we used a standard 40-weight polyester thread. The black details and outlines required precise thread tension adjustments; too tight and the black borders would pinch the white fill, too loose and you would get looping on the edges.
For the stitch direction, we angled the fill on the wings at 45 degrees to contrast against the horizontal fill of the yellow body. This minor adjustment catches the light differently on the two sections, giving a flat design some depth without adding extra colors. We also ran our multi-head machines at a lower speed—around 650 RPM—to ensure absolute accuracy on these tight satin lines. Running too fast on small designs like this always leads to registration shifts.
Border Selection and Backing Choice
Since these patches have a complex bee shape with tight curves around the wings and tail, we skipped the merrowing machine entirely. We ran a thick satin stitch border directly over the cut line and used a hot knife to seal the edges, preventing any fraying of the twill backing. For the attachment, the organizer requested a sew-on backing. When producing custom patches for event merchandise, sew-on is often the most reliable route. It gives the end-user the flexibility to sew them onto delicate knits, heavy denim, or canvas bags without worrying about adhesive failing in the wash or peeling under high heat.
Quality Control and Inspection
With a small batch of 10 pieces, every single patch gets a close manual inspection. We checked for clean jump stitch trimming between the wings and the body, verified the registration of the black outlines against the yellow fill, and ensured the heat-cut edges were completely sealed with zero loose threads. The result is a sharp, tactile little bee patch that is ready for production sewing.
Quality Checklist
- ✓High-density grid underlay to prevent fabric puckering on small 1.2-inch fills.
- ✓Angled 45-degree wing stitches to create visual depth against horizontal body fills.
- ✓Satin-stitched border with clean heat-cut edges to handle complex bee-shaped curves.
- ✓Precise thread tensioning to prevent black outline bleed into white and yellow fills.
- ✓Durable sew-on backing for versatile, long-term application on multiple fabric types.
Frequently Asked Questions
Why choose sew-on backing for small event patches?
Sew-on backing offers the most durable hold and allows the client to apply the patches to almost any material, including heat-sensitive fabrics. It avoids the risk of adhesive peeling off in the wash or breaking down over time.
Can you do a merrowed edge on a custom shape like a bee?
No, merrowing machines require a relatively simple shape like a circle, rectangle, or shield. For complex, custom-cut shapes with tight outer curves, we use a satin-stitch border and a heat-cut edge to prevent fraying.
What is the minimum order quantity for these embroidered patches?
We can accommodate small runs starting at 10 pieces, which is ideal for independent event organizers, niche merch drops, or prototyping before committing to a larger production run.
How do you prevent thread puckering on small, high-density designs?
We manage this by digitizing a solid underlay first, adjusting the machine’s thread tension, and lowering the machine speed to around 650 RPM. This ensures the stitches lay flat without pulling the backing fabric.
Disclaimer: All logos and designs are the property of their respective copyright/trademark owners. This case study is for the sole purpose of demonstrating OS 360’s custom patch quality and technique. We do not claim ownership of the original artwork, nor are these designs for sale.
Brand Representative? Request Portfolio Privacy/Removal (Corporate Email Required)
More custom patches case studies
Filed under Case Studies / Custom Patches
 Professional Cap Digitizing Case Study: High-Quality Results
 Professional Cap Front Digitizing for Sports Apparel
 Left-Chest Digitizing for Cotton: Production Case Study
 Professional Cap Front Digitizing for Complex Artworks
 Left Chest Embroidery Digitizing Case Study
 Professional Embroidery Digitizing for Left Chest Cotton
 Cap Front Digitizing Case Study
 Cap-Front Digitizing: 5,352 Stitches on Polyester