
Blog
Durkopp Adler 767 Series: Essential Maintenance Guide

Quick answer: Regular maintenance for your Durkopp Adler 767 series machine involves daily cleaning and lubrication, weekly checks of critical components like presser feet and bobbin cases, and periodic replacement of wear parts such as bobbin tension springs, presser feet, and bobbins to ensure consistent stitch quality and machine longevity.
Maintaining your Durkopp Adler 767 series industrial sewing machine is crucial for its longevity, consistent performance, and the quality of your finished products. Regular maintenance prevents costly breakdowns, reduces downtime, and ensures your machine operates at peak efficiency. This guide outlines essential maintenance tasks, common wear parts, and a recommended schedule to keep your 767 running smoothly.
Two-minute checks before you open anything
- Check needle for sharpness and straightness.
- Inspect thread path for any obstructions or snags.
- Verify bobbin is correctly inserted and wound.
- Ensure presser foot is securely attached and appropriate for the task.
- Check oil levels and lubricate daily points as needed.
- Clear any visible lint or thread scraps from the needle plate and bobbin area.
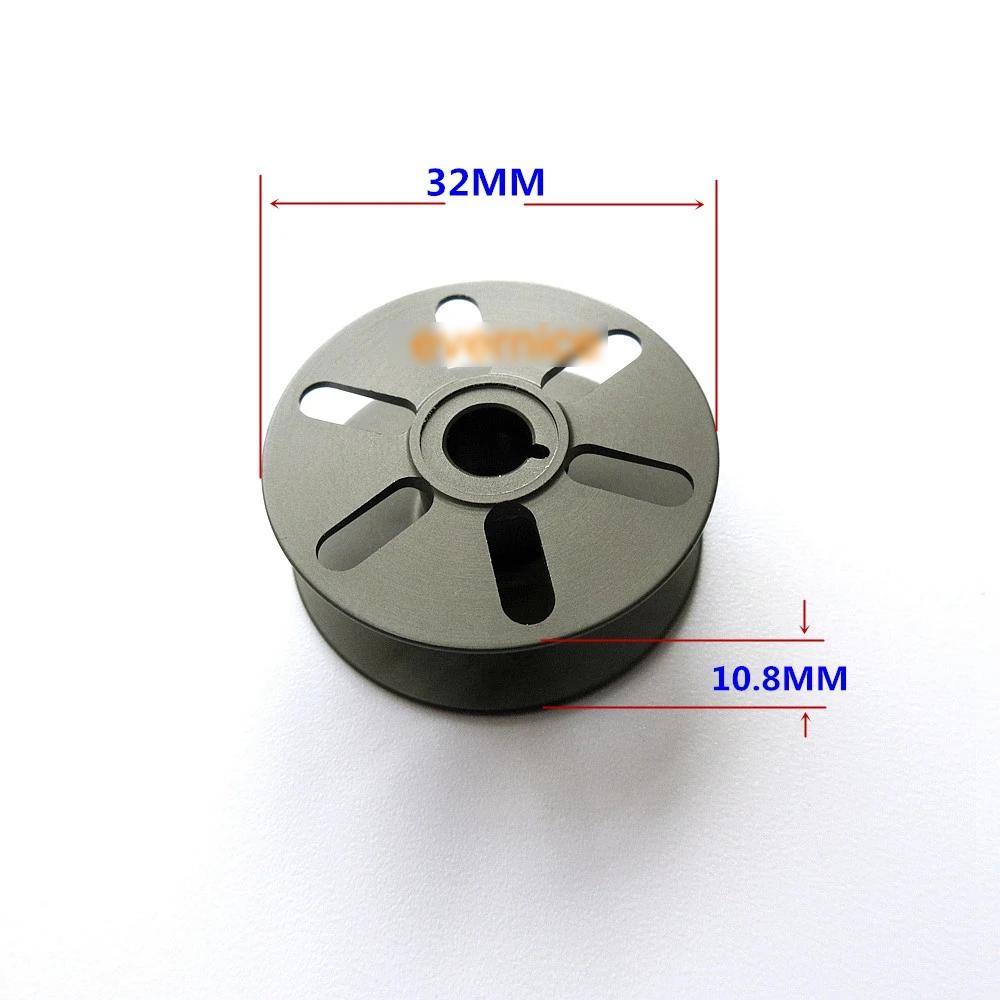
1. 32mm Bobbin Tension Spring 0767-150590 for Durkopp Adler 467, 767, 768, 867, 868 high likelihood
How to tell
Inconsistent bobbin thread tension, skipped stitches, loose bottom thread, or birdnesting on the underside of the fabric. The spring may appear visibly stretched, bent, or corroded.
Fix
- Inspect the bobbin tension spring for any signs of deformation, corrosion, or loss of spring tension. It should provide consistent resistance when thread is pulled through the bobbin case.
- Remove the bobbin case from the machine.
- Carefully unhook the old tension spring from its mounting post on the bobbin case.
- Install the new 32mm Bobbin Tension Spring 0767-150590, ensuring it is seated correctly and provides proper tension.
- Test the bobbin tension using a bobbin tension gauge or by pulling thread through the bobbin case to feel for consistent resistance.
A worn bobbin tension spring is a common cause of lower thread issues and should be replaced promptly to maintain stitch quality.
Parts involved: Thread path & tension → Screws, springs & small parts →
2. Right Guiding Presser Foot – Durkopp Adler 367, 467, 767, 768, 867, 1767 & Juki LU-2210, LU-2810A medium likelihood
How to tell
Uneven stitching, difficulty guiding material straight, visible wear or grooving on the underside of the foot, or damage to the foot's edge. Material may snag or not feed smoothly.
Fix
- Visually inspect the underside and edges of the Right Guiding Presser Foot for any signs of wear, nicks, burrs, or deformation.
- Check if the foot is sitting level and making proper contact with the feed dog and material.
- Loosen the presser foot screw and remove the worn foot.
- Install the new Right Guiding Presser Foot, ensuring it is aligned correctly with the needle and feed dog.
- Tighten the presser foot screw securely and test by sewing on scrap material.
Presser feet wear down over time, especially with heavy use or abrasive materials. Replacing them ensures accurate material handling and stitch formation.
Parts involved: Presser feet & sewing parts →
Parts you may need for your machine
In stock, tested before dispatch, Buyer Protection on every order. Part types for this problem: Rotary hooks & bobbin cases, Needles & needle bars, Thread path & tension, Presser feet & sewing parts.
 TC-805 Stainless Steel Yarn Shears – Precision Thread Clippers for ...$ 3.59View part →
 Bobbin Case & 2 Metal Bobbins for Brother, Janome, Singer, Babylock...$ 5.59View part →
 CHCH Essential Embroidery Machine Spare Part - Restore Performance$ 0.00View part →
 Portable Mini Manual Sewing Machine - Handy Needlework Tool for Sim...$ 10.49View part →
 Adjustable Retro Sewing Thimble Finger Protection for Embroidery & ...$ 4.99View part →
 3200M Metallic Silk Thread Computer Cross-stitch Thread for Machine...$ 0.00View part →
All your machine parts → Rotary Hooks & Bobbin Cases → Needles & Needle Bars → Thread Path & Tension →
3. Center Guide Presser Foot for Durkopp Adler 467, 767, 867, 869, 1767 & Juki LU-2260, PLC-2760 Industrial Sewing Machines medium likelihood
How to tell
Inconsistent seam allowance, difficulty maintaining a straight stitch line, material bunching near the guide, or visible wear on the guide edge. The guide may feel rough to the touch.
Fix
- Examine the Center Guide Presser Foot for any wear, nicks, or damage to the central guide blade or the foot's base.
- Verify that the guide is still straight and not bent, which could affect material feeding.
- Unscrew and remove the existing presser foot.
- Attach the new Center Guide Presser Foot, aligning it properly with the needle and feed dog.
- Secure the screw firmly and test the machine with your typical material to confirm even feeding and consistent seam allowance.
A worn or damaged center guide foot compromises precision stitching. Replace it to maintain the quality of your work.
Parts involved: Presser feet & sewing parts →
4. Durkopp Adler 0867-150150 (0867150150) 6-Hole Bobbins for 767, 867, 868 Industrial Machines high likelihood
How to tell
Bobbins may become bent, nicked, scratched, or develop burrs on their edges, leading to thread snagging, breakage, or uneven winding. Visible damage or rough edges on the bobbin.
Fix
- Regularly inspect all bobbins for any physical damage, such as bends, nicks, burrs, or rough edges. Run a finger along the edges to feel for imperfections.
- Discard any damaged bobbins immediately, as they can cause significant thread problems and even damage the bobbin case or hook.
- Replace damaged bobbins with new Durkopp Adler 0867-150150 (0867150150) 6-Hole Bobbins.
- Ensure new bobbins are wound evenly and correctly before use.
Using damaged bobbins is a common cause of thread issues and can lead to costly repairs of other components. Always use high-quality, undamaged bobbins.
Parts involved: Rotary hooks & bobbin cases → Threads & supplies →
Maintenance schedule
| When | What to do | Why |
|---|---|---|
| Daily (before/after each shift) | Clean the bobbin case and rotary hook area. | Removes lint and thread debris that can cause tension issues, skipped stitches, and wear. |
| Daily (before/after each shift) | Oil all designated lubrication points. | Ensures smooth operation of moving parts, reduces friction, and prevents premature wear. Refer to your machine manual for specific points. |
| Daily (before/after each shift) | Wipe down the machine exterior. | Prevents dust and debris from accumulating and potentially entering internal mechanisms. |
| Weekly | Clean under the needle plate and around feed dogs. | Removes compacted lint that can impede fabric feeding and stitch formation. |
| Weekly | Inspect presser feet for wear or damage. | Worn feet can cause uneven feeding and poor stitch quality. Replace as needed. |
| Weekly | Check thread tension components (tension discs, springs). | Ensures consistent stitch quality and identifies worn parts like bobbin tension springs early. |
| Monthly or Every 200-250 Hours (whichever comes first) | Clean the entire machine head, including thread guides and take-up lever area. | Removes hidden lint and debris that can affect thread flow and machine performance. |
| Monthly or Every 200-250 Hours (whichever comes first) | Inspect drive belts for tension and wear. | Loose or worn belts can affect timing and motor performance. Adjust or replace if necessary. |
| Monthly or Every 200-250 Hours (whichever comes first) | Check for loose screws and tighten as needed. | Vibration can loosen fasteners, leading to misalignment or component damage. |
| Every 6 Months or Every 1000 Hours (whichever comes first) | Inspect the rotary hook for nicks, burrs, or excessive wear. | A damaged hook can cause thread breaks and skipped stitches. Replace if damaged. |
| Every 6 Months or Every 1000 Hours (whichever comes first) | Inspect needle bar and presser bar for excessive play. | Excessive play can indicate worn bushings or bearings, affecting stitch accuracy. |
Stop and call a technician if
- If you encounter persistent error codes that cannot be resolved with basic troubleshooting.
- If there are unusual noises (grinding, knocking) coming from the machine's internal mechanisms.
- If the machine is not feeding material correctly despite checking feed dogs and presser feet.
- If you suspect damage to internal timing components, motors, or electronic boards.
- For any repairs that require specialized tools, extensive disassembly, or in-depth technical knowledge beyond routine maintenance.
Prevent it coming back
- Always use high-quality needles appropriate for your fabric and thread to prevent damage to the hook and other components.
- Use only recommended industrial sewing machine oil and lubricate according to the manufacturer's schedule.
- Keep your work area clean to prevent lint and debris from entering the machine's mechanisms.
- Avoid forcing thick materials through the machine if it struggles; adjust settings or use appropriate tools.
- Regularly inspect bobbins and bobbin cases for damage, replacing them at the first sign of wear.
- Ensure proper thread tension settings to reduce strain on machine parts and prevent thread breaks.
Frequently asked questions
How often should I oil my Durkopp Adler 767?
The Durkopp Adler 767 series typically requires daily oiling of key lubrication points. Always refer to your machine's official manual for specific oiling points and recommended oil types and intervals, as these can vary slightly by model and usage.
What kind of oil should I use for my Durkopp Adler 767?
Always use a high-quality, non-detergent sewing machine oil specifically designed for industrial sewing machines. Consult your machine's manual for the exact viscosity and type recommended by Durkopp Adler to ensure proper lubrication and prevent damage.
Why is my Durkopp Adler 767 skipping stitches?
Skipped stitches can be caused by several factors, including a dull or bent needle, incorrect needle size or type, improper threading, incorrect tension (especially a worn bobbin tension spring), a worn rotary hook, or issues with the presser foot. Start by checking the needle and re-threading the machine.
How do I know when to replace the bobbin tension spring?
You should consider replacing the bobbin tension spring if you consistently experience issues with bobbin thread tension, such as loose bottom stitches, birdnesting, or frequent thread breaks, even after adjusting the tension screw. Visually inspect the spring for deformation or corrosion.
Did this guide fix your machine?
Rate it - it helps other operators find the right fix.
Not sure which part is failing?
Need the logo stitched too?
Get your logo digitized by the people who know this machine
Upload the artwork, see the stitch count and the exact price in 10 seconds, then order with a free sew-out preview. $1 per 1,000 stitches, $10 minimum, 24-hour delivery. Vector conversion from $12.
After the fix
Fixed it? Keep the rest of the shop moving.
OS 360 is the shop software from the team behind this parts store. Every job keeps its status, deadline and owner while a embroidery head is down, restock alerts fire for needles, hooks and bobbins before you run dry, and quotes, invoices and payment live in one place.
- Jobs with status, deadline and owner - nothing slips during downtime
- Inventory with restock alerts, this store one click away
- Instant quotes, invoices and one place to collect payment